Growing Bromeliads – Yes, You Can Do It!!

When you visit a garden centre you no doubt have seen houseplants called Bromeliads. I am like many of you in that I often shied away from buying them as they look beautiful, you want to purchase one, but aren’t they just too finicky and hard to grow? In this blog I am here to say do not hesitate to give them a try! Like any plant they have certain growing rules they live by but none of them are difficult and if you follow these easy guide - lines you will have bromeliads for years to come.
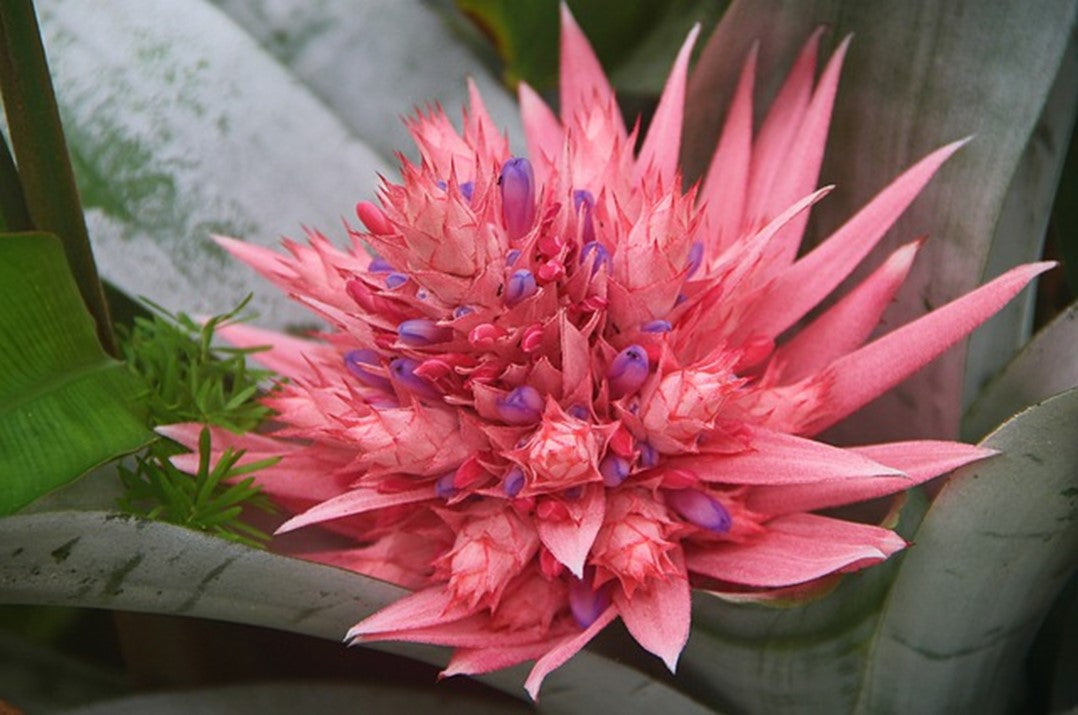
Bromeliads are native to north, central and South America. There are too many species to count – lets just say in the thousands. They are a very diverse group; an unending choice of flower colors, textures, sizes and forms. Their leaves can be thin, broad and strap-like, soft or have spines on the tips. Those with thick upright foliage usually are in the shape of a rosette forming a cup or tank in the middle. They are also relatives of the pineapple! Bromeliads are slow growers, sometimes taking 1 to 3 years to mature. They like indoor temperatures of 16 – 27 degrees C. and appreciate a tray of pebbles under their pot that you can refill with water for extra humidity.

Bromeliads are divided into two categories – epiphytic and terrestrial. Epiphytic plants are those which cling to trees and absorb nutrients through their leaves. The roots are there to help anchor the plant to the tree. Orchids and Air Plants are also epiphytic plants. Terrestrial bromeliads grow on rocks or in a fast - draining soil, usually under the rainforest tree canopy. There are also varieties that grow in drier environments .
It is important to know the common and latin name of the bromeliad(s) you take home. This will take a bit of internet research or may be on the plant tag. Many genera and species have different growing and bloom initiation requirements. These requirements are not difficult but to have the best growing success, it is good to know the name.
As houseplants both epiphytic and terrestrial bromeliads are grown in a pot containing a fast draining, and porous potting mix. This is more for the benefit of the bromeliad grower that must deal with thousands of bromeliads at a time. Pots are also easier to manage in the garden centre and at home.
Light
Most bromeliads that you bring home require bright, indirect light. If your bromeliad has soft, spineless leaves it prefers lower light levels. The leaves will turn yellow if there is too much light. Bromeliads with stiff, hard leaves prefer bright, indirect light. Do not put any of them in full sun.
Soil and Watering
The most important requirement of bromeliad soil is that it is fast draining and somewhat acidic. The soil should be moist but not soggy. Never let the pot sit in water. A good soilless mix to use is equal parts sphagnum peat moss, perlite, and fine to medium orchid bark. Before mixing the potting ingredients, drench the orchid bark in boiling water and soak it for 2-3 hours.
If your bromeliad has a central cup you can fill this cup ¼ to ½ full of water. It is best to use distilled water as hard water or softened water can leave mineral deposits behind that hurt the plant. Make sure to flush the water from this central cup once a week and replace with fresh distilled water.
If you choose to keep water in the cup, water the soil mix sparingly during the growing season. Bromeliads prefer to be on the dry side as opposed to being too wet. Reduce watering during the winter as well.
If your bromeliad develops brown and drying leaves this may be due to a lack of soil water, lack of cup/tank water or a lack of humidity.

Fertilizing
Bromeliads are not heavy feeders. Most bromeliads have similar nutritional requirements. Use an all - purpose orchid food at 1/8 to ¼ strength. The most important recommendation here is not to use a fertilizer with too much nitrogen (the first number on the bottle). Fertilize once a month from April to August while the plant is actively growing. Mix the fertilizer and water the soil. Mist the plant leaves with the same mix. Remember they also take in nutrients through their leaves. Do not fill the central cup /tank with fertilizer water. Even a week is too long for it to sit in the cup. This will lead to foliage burn or rot.
Bromeliads have a winter dormant stage like most houseplants and do not require fertilization. You will not have to water as often in the winter. Keep a tablespoon or two of distilled water in the tank and flush/replace weekly.

Flowering and Propagation
The most impressive part of a bromeliad is its ‘flower’. The actual flowers are small and rather insignificant. The flowers are surrounded by colorful and showy bracts that can be red, green, purple, pink, orange or yellow. This beautiful and unique floral display will last for months. Just before the bromeliad started to bloom it stopped all leaf growth. Do not expect to see new leaves forming at this stage.
Most mature bromeliads will only bloom once. Do not take it personally when the ‘mother’ plant dies after blooming. The flower will start to brown and the mother plant will slowly decline over a period of months. While this happens she will begin to create new bromeliads called offsets or pups at her base near the soil. The pups are clones of their mother. When the flower finally dies, you can cut the flower spike off at its base. The mother plant will direct her energy into creating more pups.

The longer the pups remain on the mother plant, the better. Once the pups reach half the size of the mother plant and forming their own cups, you can remove them. Some pups may develop roots while still on the mother. This is a bonus, but not absolutely necessary for a pup to survive.
Carefully cut the pups off the mother plant with a sterilized sharp knife. Keep the cut as close to the mother as possible. If you removed any soil, put it back around the mother plant. She may produce more pups.
After you remove the pups, dip the cut ends in rooting hormone. Shake off any excess. Pot them up into 4 inch or 6 inch pots that contain the bromeliad growing medium. If the plant is top heavy it is wise to stake each pup until it produces a decent root system. Keep some distilled water in the pup’s cup and replace weekly.
At this stage each pup needs warmth, light and humidity. Keep the growing medium moist but not soggy. An ideal growing environment would be a warm room with good morning light in the summer and shade for the rest of the day. Pebble trays under the pots increase the humidity.
Bromeliad pups will take 1-3 years to reach maturity; depending on the species. Only after a bromeliad reaches maturity will flowering occur. Often some bromeliads are reluctant to flower and need some encouragement by using the process of ‘forcing’. Before forcing drain the water out of the pup’s tank.
Forcing bromeliads can be achieved by putting the bromeliad, pot and all into a large clear plastic bag. Drop in a few pieces of ripe apple and tightly close the bag. The ripe apple will produce ethylene gas which initiates flowering process. Put the bagged bromeliad in a shady area for 7-10 days and then remove it from the bag. Do not fertilize your bromeliad 2 weeks before you start to force the bloom until 2 weeks after the bloom begins. In 6-14 weeks the bromeliad will start to show signs of bloom development. Keep temperatures warm at night on a consistent basis – 18 degrees C is ideal. As you can see this is quite the exercise in patience but rewarding if you can take a bromeliad from pup to bloom!
Pests
For the most part bromeliads are relatively free of pest and diseases. At times they are prone to spider mites, aphids and scale. To help deter these pests I would recommend putting your bromeliad(s) in a warm shower once in awhile. Just make sure to refill the cup with distilled water.
Bromeliads are not toxic to humans and animals. People who are allergic to latex should exercise caution as the sap from these plants may cause an allergic reaction.